Mental Radio Machine I & II
Creation
Aurélio Edler-Copes
Outline
- Version Information
- Detailed Staff
- Electronic Equipment List
- Work Related Information
- Downloads
- Instructions
action
Updated at
Vous constatez une erreur ?
The setup and the execution of the electroacoustic part of this work requires a Computer Music Designer (Max expert).
Version Information
- Performance date
- 9 mai 2019
- Documentation date
- 18 mars 2020
- Version
- Creation
- Status
- valid
- Validation date
- 2 mai 2020
- Documentalist
- Benjamin Levy (Benjamin.Levy@ircam.fr)
- Realisation
- Sylvain Cadars (Sound engineer)
- Damien Ripoll (Assistant)
- Benjamin Lévy (Computer Music Designer)
- Length
- 30 min
No other versions
Detailed Staff
bass flute, bass clarinet, percussionist, electronic/MIDI keyboard/synthesizer, electric guitar, viola, cello
Detailed staff comes from Brahms, send mail to ressources-contenus@ircam.fr for correction.
Electronic Equipment List
Audio Equipment
- 1 MKE 2-2R Red Dot
- Lavalier Microphones (Sennheiser)
- 1 MKE 2-2R Blue Dot
- Lavalier Microphones (Sennheiser)
- 6 DI-box
- DI box (generic)
- 1 MV1
- Contact Microphones (FWF)
- 1 MC1
- Contact Microphones (FWF)
Computer Music Equipment
- 1 MIDI booster
- Booster (generic)
- 2 MIDI Keyboard
- MIDI Keyboard (generic)
- 1 Footswitch / Sustain Pedal
- Footswitch / Sustain Pedal (generic)
- 1 Volume Pedal
- Volume Pedal (generic)
- 2 MacBook Pro
- Apple Laptops (Apple)
- 1 footswitch control
- MIDI Controllers (MIDI Solution)
Musical Instruments
- 2 OWL
- Programmable pedal (Rebel Technology)
- 2 EV 5
- Expression pedal (Roland)
- 3 Whammy 5
- harmonizer pedal (Digitech)
- 3 Black Secret
- Distortion Pedal (Mooer)
- 3 Little Big Muff Pi
- Distortion Pedal (Electro Harmonix)
- 3 Crybaby CB-535Q
- Whawha pedal (Dunlop)
- 2 Sentry
- Noise Gate pedal (T.C. electronic)
- 6 Pro RMP
- Re-amping pedal (Radial Engineering)
Downloads
Instructions
Audio Setup
Pedals & Amp setup
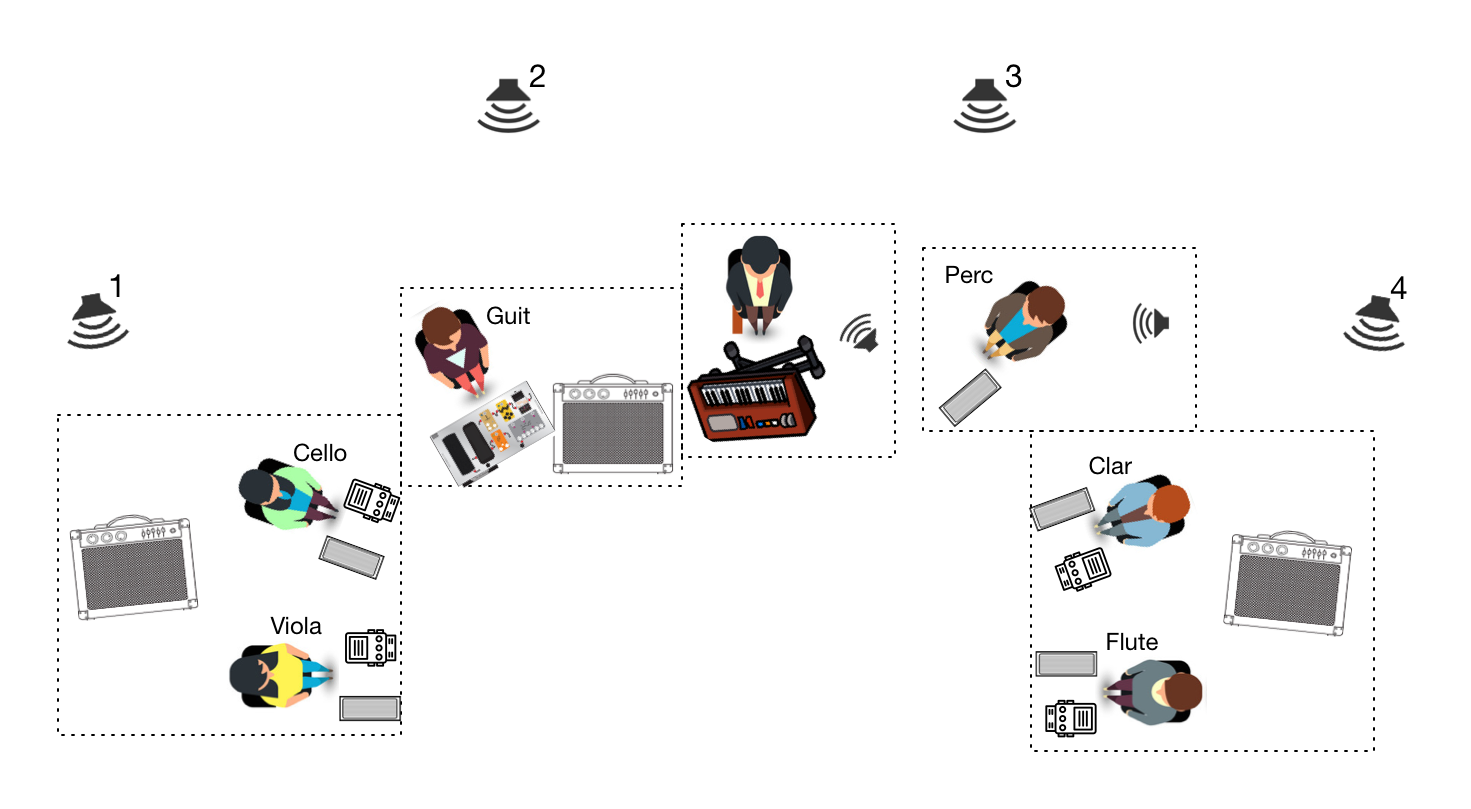
4 groups of instruments have a effect pedals and guitar (Fender) amplifiers:
- Viola and Cello have a common set of pedals, spread across both musicians and output in a guitar amplifier placed behind them.
- Flute and Clarinet have also a common set of pedals, spread across both musicians and output in a guitar amplifier placed behind them.
- Guitar has its own dedicated and custom pedalboard output in the amplifier in front of him and keyboards.
- Cajon/percussions has a Whammy pedal only and is output in a dedicated monitor behind the player.
Audio setup
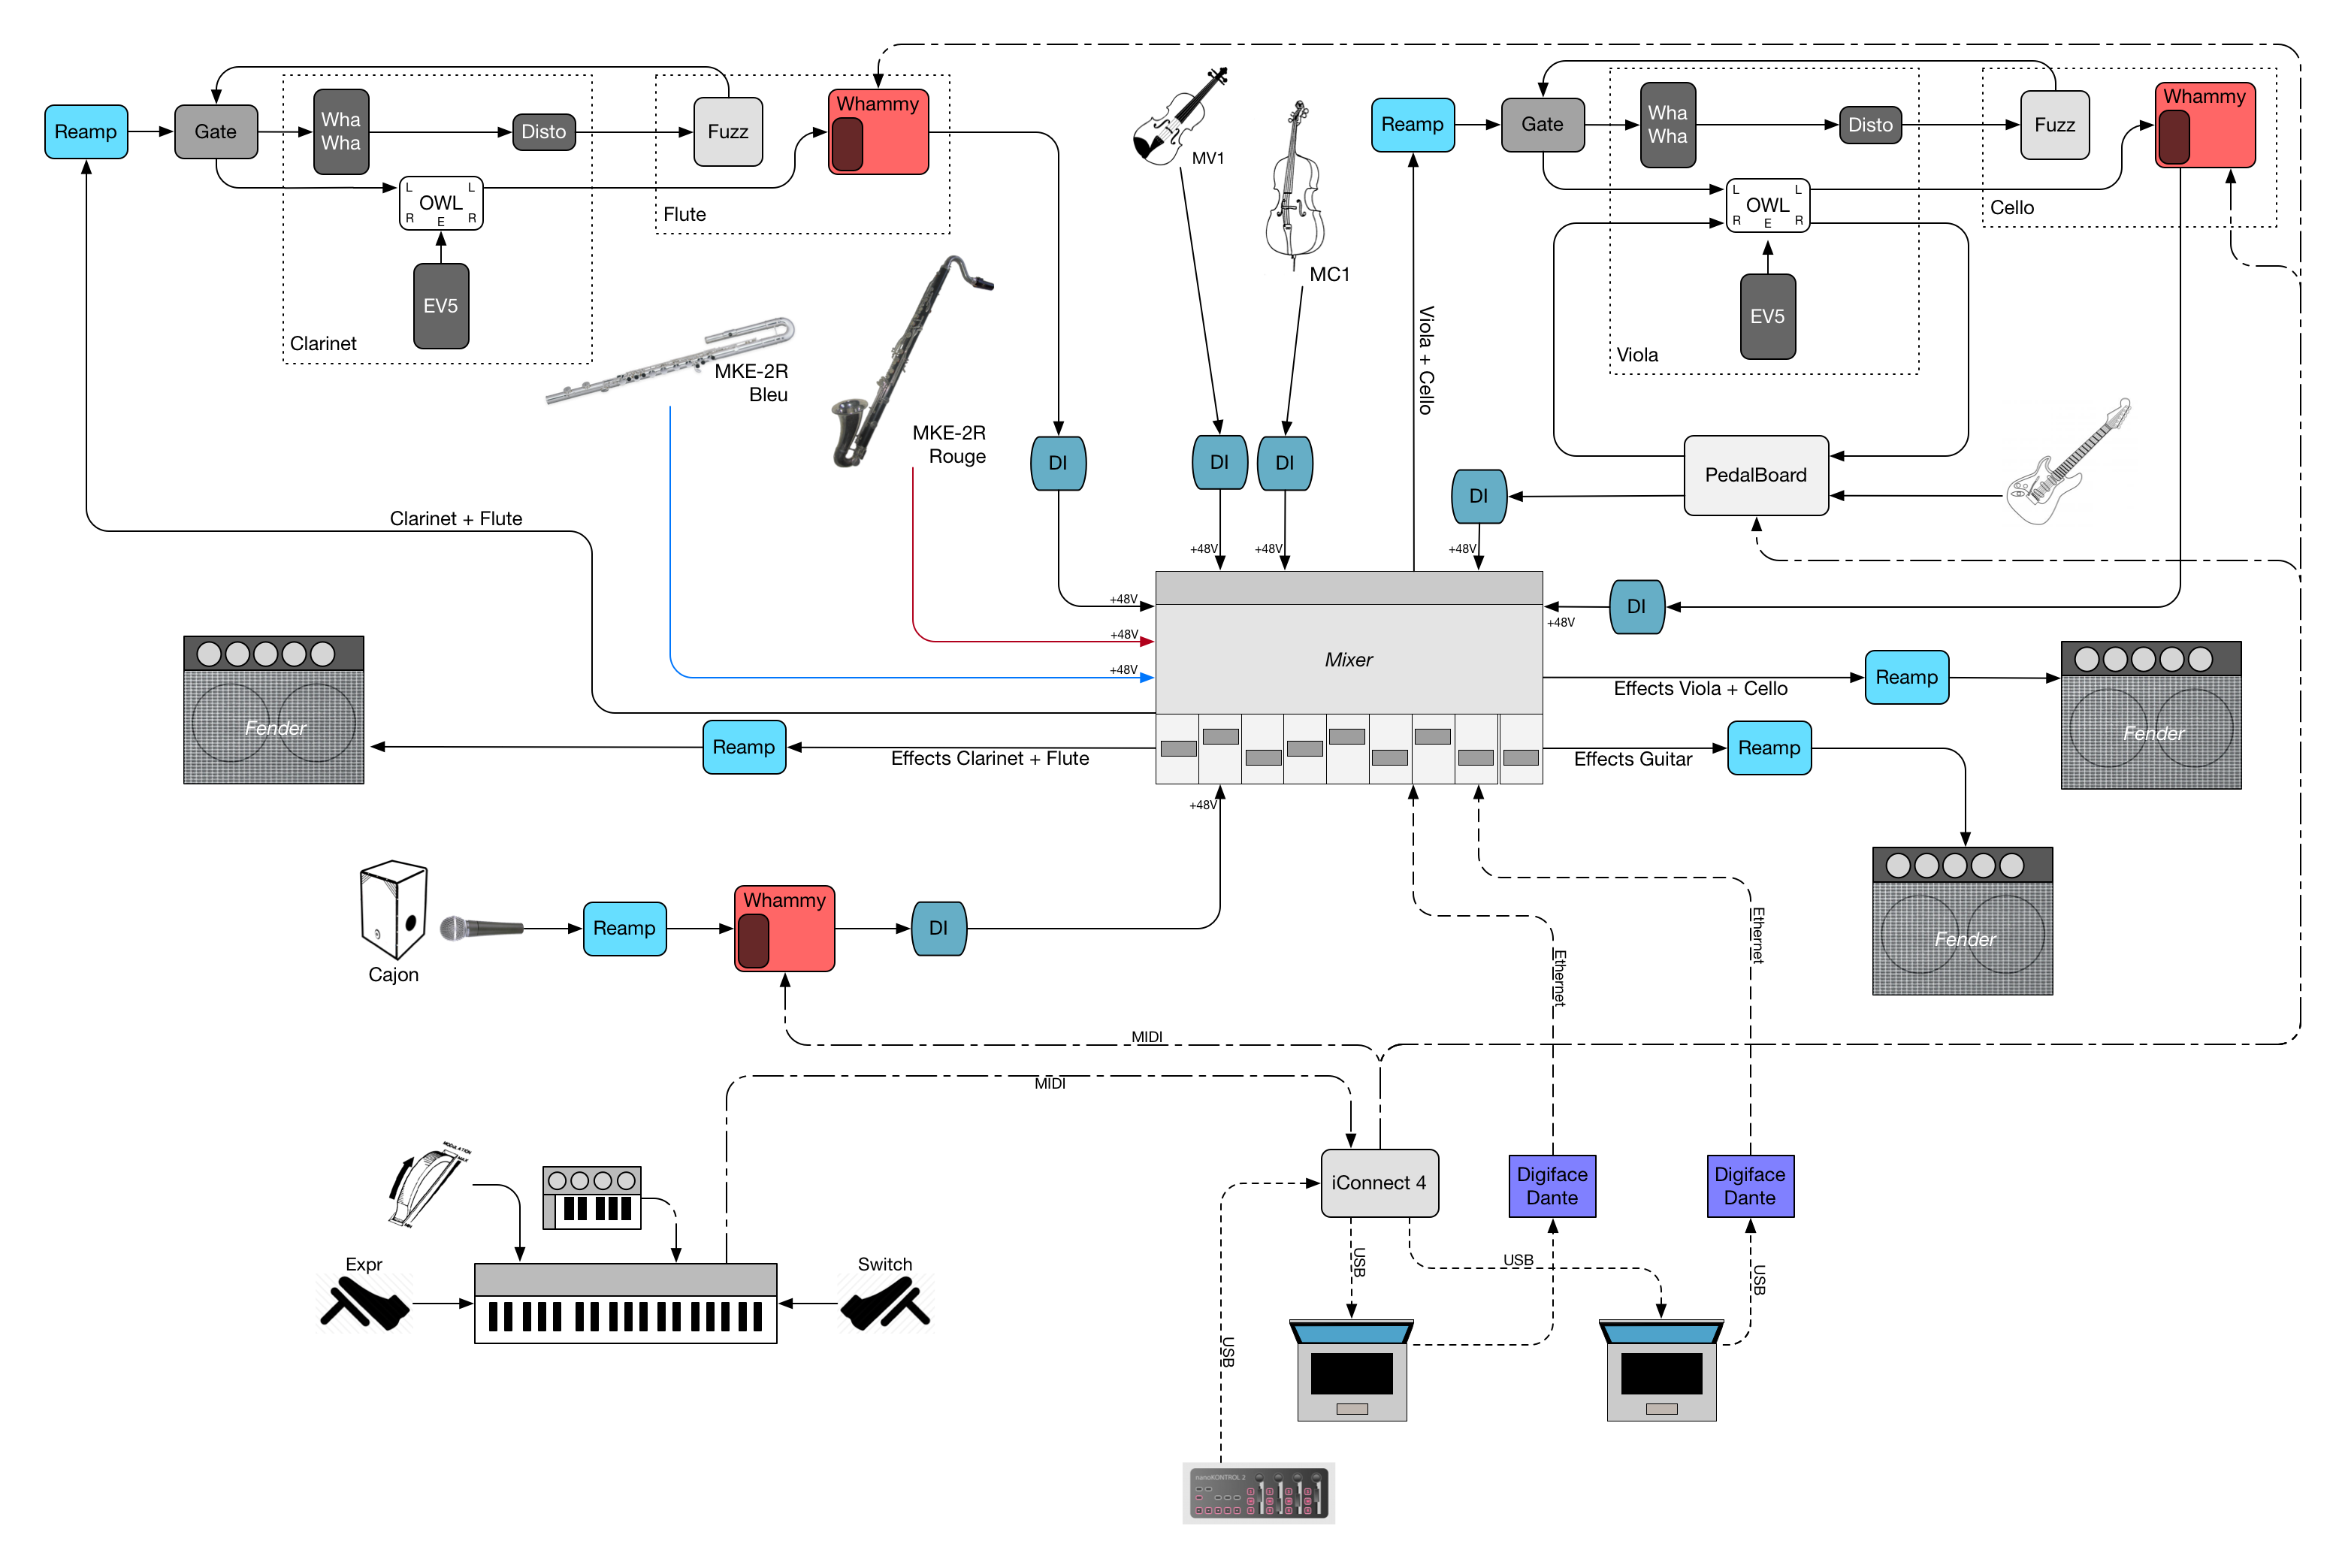
The audio routing and connexions are quite complicated in this piece as all the instruments have pickups going through the main mixer, then sent back to effect-pedals controlled by the musicians. Then the output of every pedal board is sent up to the mixer and back to the amplifiers on the stage. This means that a lot of DI-boxes and ReAmp-box are used to adapt levels and impedances to this circuit. The whole setup is best described by the diagram below:

Electronics & Loudspeaker setup
On the contrary, the electronic part setup is rather simple, the Max patch is sent to 4 channels, each of them being directly routed to 4 main speakers place behind the music ensemble to form an arch in the background as show in the diagram below.

Performance Patch
Software installation
The electronic part is solely composed of the Max patch and Sounds banks downloadable below. No specific external is necessary. The patch runs in Max 8 and no specific instruction is needed concerning vector/buffer sizes. A good habit is to run it with "Overdrive" option ON (but that's not mandatory).
Patch presentation
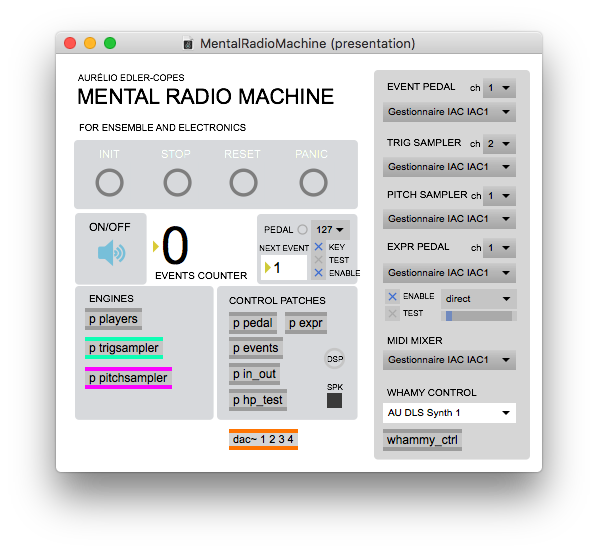
The main patch of the piece is captured below.

The electronics has 3 main engines:
- a triple file player used to play whole files triggered by the events and sometimes transpose and scratch by the keyboard player
- a trigger sampler controlled and played note by note with one of the keyboards. This sampler assigns different files for different keys of the keyboard (starting from MIDI note
36). This sampler does not transpose files depending on the key pressed but depending on the expression pedal connected to the keyboard. - a pitch sampler controlled and played note by note with the second keyboard. This sampler divides the keyboard in 2 sections (lower/upper half) and assignes one file to each section depending on the cue (event). For each section of the keyboard, the same file is played for every key pressed and transposed according to the MIDI pitch of the key.
Midi setup
There are several MIDI inputs and outputs in this piece. We used a sole iConnect interface to gather all of them and interface them with Max/MSP. The configuration of those is done in the right column of the main patch captured above.
Inputs
- A sustain/footswitch pedal connected to one of the keyboards and received as MIDI controller
64is used to trigger the next event of the piece. You can turn it off or change the "polarity" of the pedal with the small menu on the line labeledPEDAL. The smallbangnext to it is only used for visualization of the incoming pedal hits. - The large MIDI keyboard on stage is routed to the pitch sampler.
- The small MIDI keyboard on stage is routed to the trigger sampler. Those two keyboards can be played on the same MIDI input/connection if they are assigned to two different channels.
- An expression pedal connected to one of the keyboards and received as MIDI controller
11is used to transpose either the trigger sampler or the file players depending on the cues. - The modulation ring (pitchmod) of one of the keyboards is received as MIDI controller
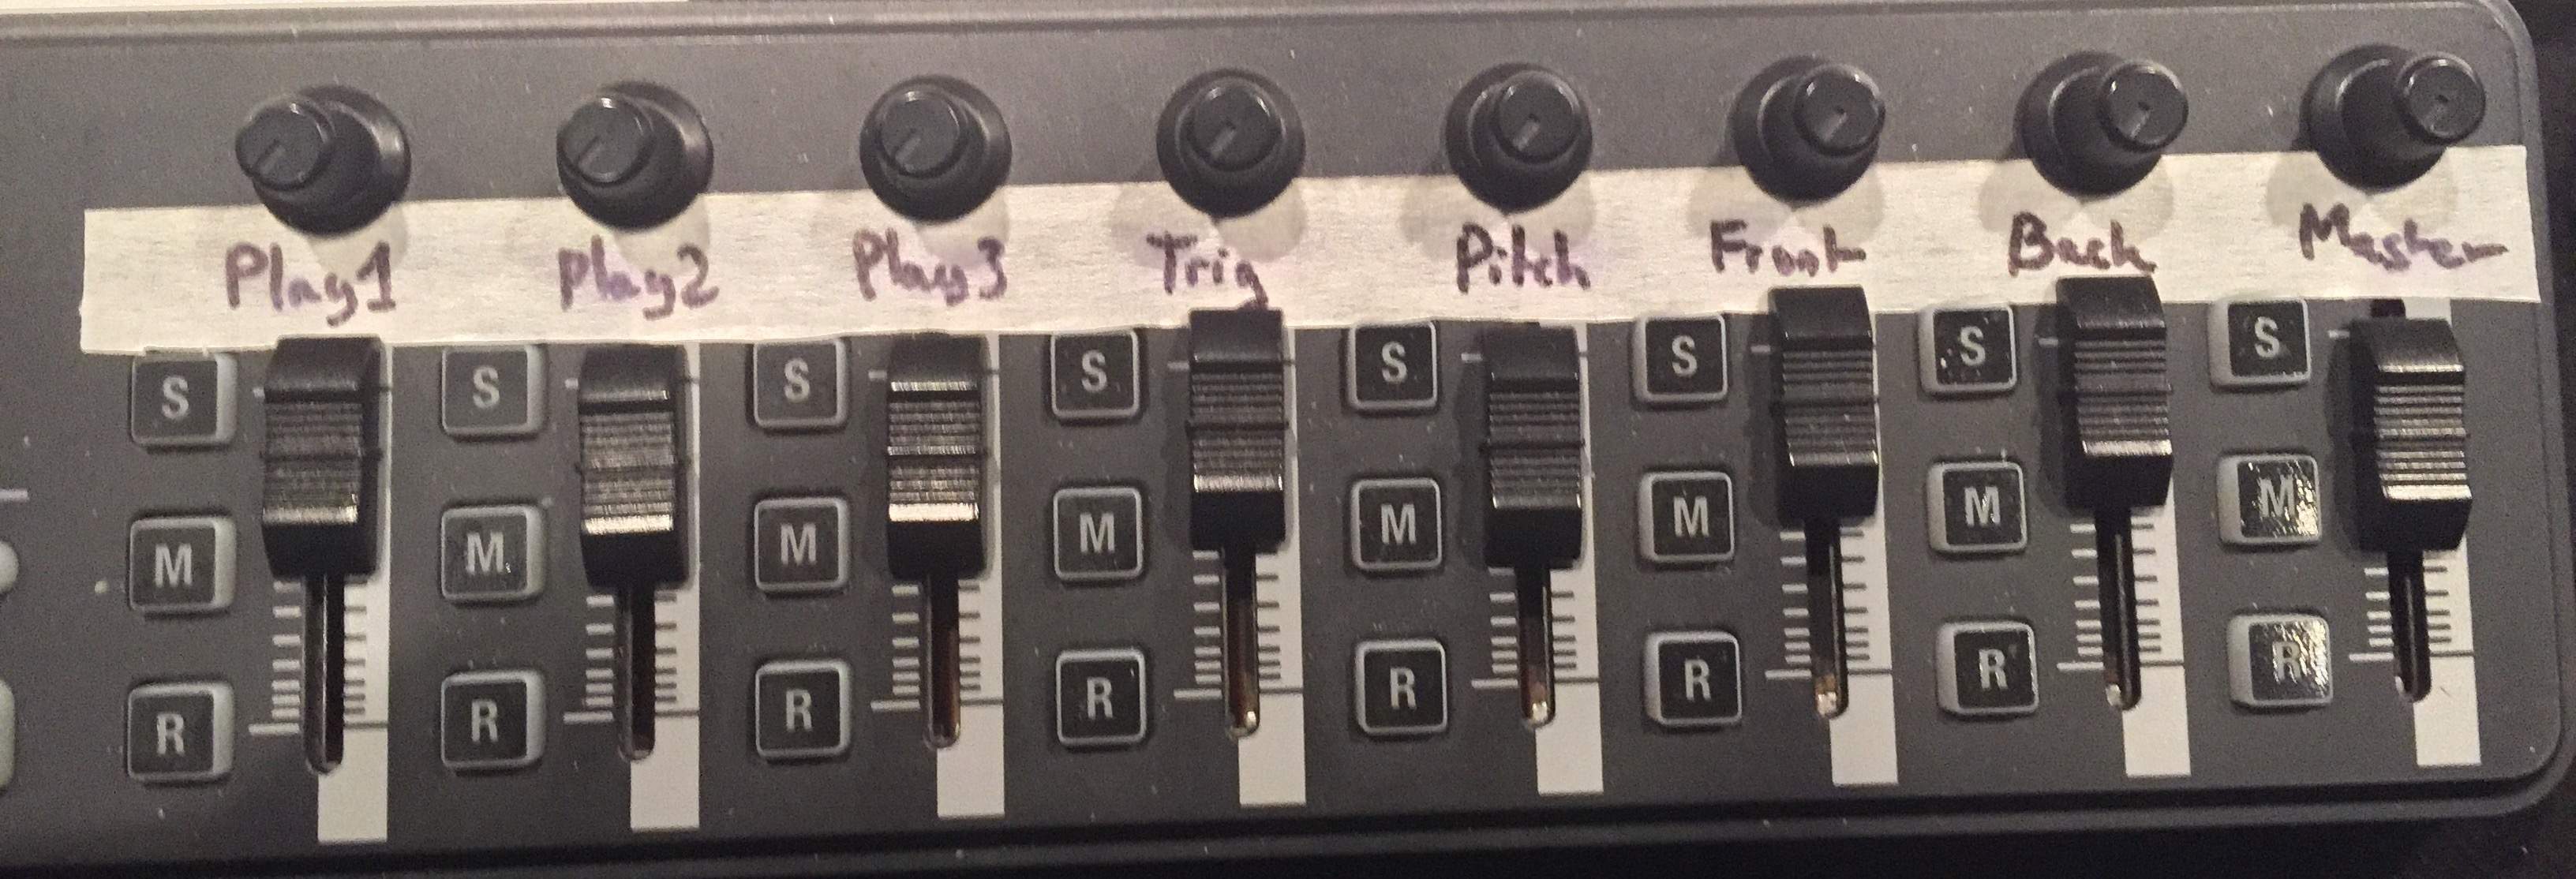
1directly in the players patch (objectctlin 1) - Finally, you can chose a MIDI controller as a nanoKontrol2 or a BCF2000 connected to the computer and acting as
MIDI MIXER. Below is a picture of the nanoKontrol routing used for this performance of the piece.

Outputs
The Max patch of this piece is used to send control signals to the 4 Whammy pedals on stage, changing their mode depending on the cues (event) of the piece. These info are sent as MIDI Progam Change messages dispatched to each of the Whammies depending on the MIDI channel (1to4). In the menu at the bottom of the right column of the patch, you need to chose the correct MIDI device connected to your computer and going on stage to be split and connected to the 4 pedals.
Manual controls
Init / Stop / Reset / Panic
The bangs on the top of the patch are used to initialize, stop the playing of files, reset the state of the patch (in particular when rehearsing) and stop everything in case of emergency
key shortcuts
esckey is mapped to reset the patch (same àresetbutton).leftandrightarrows are mapped to go forward or backward for thenext event.- if the
KEYcheckbox is ticked next theNEXT EVENTlabel in the main patch, then you can use thespacebarto effectively trigger the next event.
Starting
There are not actions needed after loading the patch to start playing the piece. The init button is loadbanged automatically and turns also the DSP of Max ON. However, be sure that your MIDI inputs and outputs are correct!
OWL Pedal
This piece uses a programmable OWL pedal from the firm Rebel Technologies. We designed for this piece a specific digital distorsion effect based on sampling rate reduction and sample depth reduction (bit crushing). The design of those engines have be made in Max/MSP with the use of gen~ object which allows to compile and embed the resulting effect into the OWL pedal.
gen~ patches
In the archive named OWL Patches & Code above, you will find all the element to examine, modify and compile (if needed) the digital distorsion (named digisto). These are Max and gen~ patches as well as the corresponding exported C++ code and a sysex export of the effect as we used it.
Note: the OWL parameters are to be used in gen~ with parameter names: A, B, C, D, Exp, and Push.
sysex file
You can upload the syx file (MIDI sysex export) directly to the OWL without needing to recompile anything. For that operation, you need download and use the application OwlControl found on this website: https://github.com/pingdynasty/OwlControl
Load the syx file with the Tools/Load file from patch menu of the application. Choose either to run or to store the patch in one of the 4 custom slot of the pedal. Then upload to the pedal with the Save to OWL button of the interface. You should be able to test the digital distorsion directly on the pedal, without connecting it to a computer.
Knobs & buttons
- As any guitar pedal, the main metal switch is use to engage or bypass the effect.
- The top left knob is a
Drivecontrol. It thus controls the intensity of the effect from no effect at all to full distorsion. - Second to left knob is a
Mixcontrol balancing from left to right between the decimation (sample rate reduction) and the bit crusher (sample depth reduction) effect. In the middle, both effects are active and mixed together. - The third knob is a
Tonecontrol which changes the center frequency of bandpass filter integrated at the end of the effect chain. - The most right knob is a
levelcontrol which allows you to set the output volume of the pedal
Toolchain & Compilation
If you wish to compile yourself the Max/gen~ patch to modify it and upload it to the OWL pedal, you will need to gather those 3 tools:
- the OWL program containing the whole architecure of folders and scripts aso. to compile for the pedal
- gcc arm compiler (to make patch binary) to be placed in the
Toolsfolder of the OwlProgram [1] - FirmwareSender (to make sysex and run) to be placed in the
Toolsfolder of the OwlProgram as well [2]
Building a Max gen~ patch, upload and run on the OWL pedal
To build and compile a Max/gen~ you need to export the code from the patch with the exportcode message. This creates a .cpp and a .h files as well as a gen_dsp folder in a code folder alongside your patch.
Then, you shoud be able to compile and run a patch called digisto with those steps:
- copy
digisto.cpp,digisto.handgen_dspfolder intoPatchSourceof the OwlProgram - in the terminal
cdto your toolchain/OwlProgram directory - then execute
make GEN=digisto runto compile and upload patch to attached OWL
Sysex export of a Max gen~ patch
Requires the .cpp and .h files of a gen~ patch generated by Max.
Then to compile and create a sysex file of a gen~ patch called digisto:
- copy
digisto.cpp,digisto.handgen_dspfolder intoPatchSource - in the terminal
cdto your toolchain/OwlProgram directory - then execute
make GEN=digisto sysexto compile and package binary as sysex
References
[1] https://developer.arm.com/open-source/gnu-toolchain/gnu-rm
Updated at
Vous constatez une erreur ?
IRCAM
1, place Igor-Stravinsky
75004 Paris
+33 1 44 78 48 43
heures d'ouverture
Du lundi au vendredi de 9h30 à 19h
Fermé le samedi et le dimanche
accès en transports
Hôtel de Ville, Rambuteau, Châtelet, Les Halles
Institut de Recherche et de Coordination Acoustique/Musique
Copyright © 2022 Ircam. All rights reserved.